Cockpit
Tents
A tent is a
magic canvas which turns an open Drascombe into a compact Yacht or multiplies the
indoor living space of a cabin Drascombe. They even work on land by turning
your Drascombe into a trailer tent for the journey to new cruising grounds. The
only downside I have found is some extra difficulty of getting to the foredeck
at night when at anchor but this only applies to cabin boats. There are three
main sources for tents. Standard tents from the boat manufacturer such as Churchouse Boats, Custom tents created by taking your ideas
to a sail maker such Cover to Cover as or project tents made completely at
home. Here are some examples of the main types of design to give you
inspiration – and a couple of sun awnings for good measure. Appuskidu’s
tent is here too with some comments about its development.
Simple “Swallows and
Amazons” type “sheet over a rope” tents.

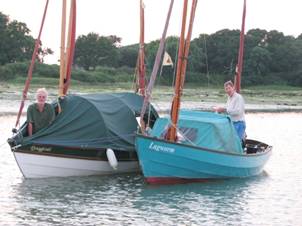
The tent on
the Lugger “Karma” seen here in the early morning mist on the river Dart is a
classic one of its type with a generous amount of material giving it more
headroom than most. Deck drainage arrangements on a Drascombe mean that, at the
expense of damp side decks, tents can be fitted inside the gunwales but an
arrangement to hold the hems outside the gunwales gives more width.
On his
Longboat Cruiser “Moonglow” the simple PVC sheet shelters
Tents with Hoops
Hoops are a
popular method of supporting tents The bamboo or iron
used at the end of the 19th and start of the 20th Century
are seldom seen today. Hoops can be made not only from stainless steel or aluminium
tubing but also from plastic conduit, plastic water pipe, plastic drain rods, plastic chimney sweeping rods, fibreglass tent poles and no
doubt other materials too.
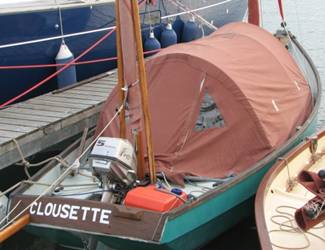
These east
coast examples show a standard tent on the Lugger Clousette
and a simple custom design on the Longboat Cruiser.

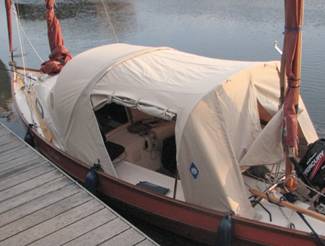
A couple of
smart sailmaker’s constructions are seen on this
Dutch Coaster at

Smaller
Drascombes can have living accommodation too. Here is a professional tent on
the Hill family’s well travelled Scaffie.
Standard
inexpensive hooped or domed tents from the camping store have been adapted by
many for use on open Drascombes. The Dabber “Bel
Canto” had a fine nylon tent above the set of athwartships
planks which owners sometimes use to fill in between the side decks and the
centreplate capping to create a broad sleeping platform with stowage under. The
planks are stowed alongside the centreplate case during the day.
Extra space
A lot of extra
space can be had if the roof is flatter rather then round.

The beautifully
engineered example above on Tom Richardson’s lugger
“Pelican”, seen here at Dell Quay in 2005, had space enough to host a sizeable
party at Folkestone on the eve of departure on the 1997 cross channel rally.
This kind of design requires either rigid eaves using (say) oars or boathooks
etc or as here a connection between main and mizzen shrouds. Not easily visible
in this cropped picture, mizzen shrouds here are also serving for the aft fall
of the signal flags used to dress Pelican overall.
Another fine
construction is the capacious “pill box” style tent (below) on the Lugger
“Sarah Jane” seen at Wells next the sea. Here athwartships
ceiling battens are supported by the gunter
yard used as a ridge pole lashed to the mizzen mast.


On the Coaster
“Ebony” below, the principle has been used to gain extra space on a simple
Coaster tent.

Extra length
In
all of the examples above, the tent comes no further aft than the mizzen mast step. A way of increasing storage space, which
is at a premium when two (or more) are sleeping on board, is to extend the tent
to the aft extremity of the boat.


That
is illustrated above on Jack O’Keefe’s Coaster “Tyboat”
(above) seen here afloat in a Croatian harbour and ashore on a European
campsite.
On
an open Drascombe you can use all of the available space before the mainmast
too. Ken Charman’s professionally made tent covers
his Lugger “Draggletail” from stem to stern.
Extra Height
This
is the tent which started a trend in Coaster tents. It is another design by Tom
Richardson. This time on his Coaster “Gannet” photographed at Beaulieu in 2002.
Tom didn’t see any reason why he shouldn’t be able to stand up in his tent so
he just raised the roof. He took his thoughts to “Cover to Cover”
in Birdham who made him up this splendid tent.

Other
owners were attracted by this design and “Cover to Cover” have received a
number of orders for similar tents - like this “big window” version on Miles
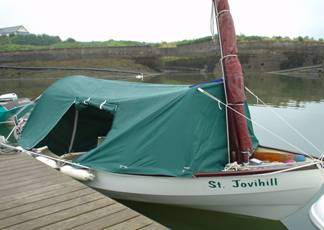
& Lizzie’s Skylark. Owners have since approached them for tents for other
Drascombes also. They made “Draggletail’s” Lugger
tent and the one on the Scaffie “St Jovihill” both to be seen on these pages. I see that they
even now make a full length Coaster version just like Appuskidu’s.

Appuskidu
Appuskidu’s tent
combines many of the features mentioned above. It is a modified hoop tent that
uses all available space and incorporates Tom’s full standing headroom idea.
Unfortunately I didn’t take any pictures when I was making it – I was still
using 35mm film in the camera at that time and wasn’t so liberal with my photo
recording – but I set out here the main features and construction details. It
was made in a very similar way to the summer boat cover shown in the Boat Cover
project page. The tent poles were erected first to the desired head room then the fabric was thrown over (this time from
side to side), joined with a seam over each of the poles, marked up and sewn.
Zips were sewn in the seams and separate panels were used to make the rear section
down to the transom. A dart was inserted across the middle of the front panel
to bring it neatly down to the sprayhood. The tricky
part was sewing the “Chimney” around the mizzen mast. Tricky but not impossible. At the time of writing the tent
is nine years old and is holding up well. No repairs have been needed, only a
couple of minor modifications.


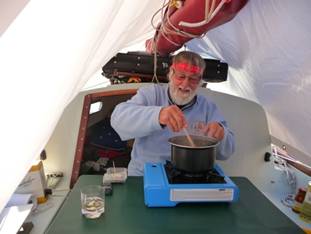
Above are two
pictures taken at anchor. One snugged
down on the sand at low tide in the middle of the Netherlands Waddezee. The other opened up at breakfast near Murano in the Venice Lagoon.
To
start at the front, it fixes to the sprayhood at the
front like all Coaster tents. Most Coasters have 50mm Velcro loops already on
the spray hood for the purpose of attaching a standard tent. Some have Velcro
hooks and some have zips. Appuskidu has Velcro.
The
tent poles have developed over time. The constant has been that each of the two
hoops has comprised three parts. A Lugger can have a long flexible pole which,
when straight, will lie on the side deck. Shorter lengths are needed for a
Coaster. For storage on a coaster the poles can be inserted from the cabin into
the space under the cockpit floor. Since I always put the tent up at night, my
poles just live on a bunk during the day.
Originally
the poles were thin 8mm fibreglass (GRP) rods of the
type used on backpacking tents. These kept breaking and could not be held onto when
boarding so we moved on. First to plastic conduit followed by plastic water
pipe then plastic drain/chimney rod. Joints were made by putting a short length
of dowel in one end and side fixing it with a small screw. The dowel would then
engage with the adjoining pole. The drain rods screwed together of course.
These plastic poles were ultimately unsatisfactory however because in hot
weather they would bend and take a “set” when cooled so that the tent would no
longer be vertical.


The
final solution is a mixture. The uprights are bent aluminium tubing and the
roof poles are drain rod. The joints are made with pieces of thick 11mm GRP tent pole rod (any dowel of the right diameter would
do) fixed into the end of the uprights to engage with the ends of the roof
poles.

A
short piece of the GRP rod is fixed inside the middle
of the roof poles to stiffen them in the middle so that the roof is flatter
than if they were allowed to bend into a simple arc. The join can be seen in
between the colour coding tapes. This increases the area over which standing
headroom is available. The only reason for not using aluminium tubing for the
roof poles is that the plastic ones are straighter when not in use and thus
easier to store. The aluminium uprights, as well as remaining upright, can also
be held onto gently for balance when boarding. The poles are finished by
blocking their ends with expanding foam. The reason for this is that they will
then float if dropped overboard.
An
important feature is that when erecting the tent the fabric is first attached
to the sprayhood then thrown over the frame and
secured to the poles by Velcro flaps. Some tent designs require the poles to
first be passed through tubes in the fabric. That can be difficult on the water
especially on a windy day.
The
fabric I used is “Odyssey”, an impregnation coated, 100% polyester. Don’t
confuse with a curtain fabric of the same name. It is strong but relatively light weight and compact which means that this big tent
weighs just 4.3 Kg and packs into an ordinary stuff sack. The poles weigh only
another 2.3Kg. Fabrics vary in breathability and there is no such thing as a
fabric that is both breathable and 100% waterproof. The very expensive high
tech fabric used in top of the range “waterproof” clothing uses multiple layers
to achieve a high level of waterproof performance with some breathability.
Odyssey is highly waterproof, but with low breathability so condensation can
occur in heavy rain. All seams are similar to “French seams” double sewn and with
the open side facing aft. The zips are heavy duty tent
zips with toggles on the inside and the outside. The one at the stern
disengages at the top to allow the mizzen mast through
and all were special order since I wanted matching brown ones.

In
the picture above Appuskidu is moored alongside a pontoon at Den Oever in the

In
this picture of the back of the tent you can see the construction of the panels
sewn together behind the rear hoop. A couple of other features are visible too.
First there is the zip running from the transom up to the “chimney” around the
mizzen. This allows the fabric to be closed around the mizzen
mast - and the tiller if the rudder is raised and the tiller is placed
vertically against the mizzen mast. It is important to allow for the tiller
when making the chimney. I think that the bulge halfway down the zip is my head
as I was undoing the bottom of the tent on the starboard side when the picture
was taken. Then there are the holes at the fairleads to allow mooring ropes to
pass through. You cannot see in this picture but the hem of the tent is
stiffened with cord and the holes for the ropes are shaped like a “T” so that
the hem can close under the rope. Such shape niceties are not important this
far back but it is important to make allowance for the mooring warps. The ropes
may of course leave the fairleads or cleats at a wide range of angles
vertically as well as horizontally. Remember that springs (already removed
here) go forward in the opposite direction to the warp that is visible in the
picture.

There
is of course another reason to have a zip at the back. Virtually all of the
tents on the boats above allow for access on each side. There are however,
occasions even in
Finally,
the other feature of Appuskidu’s tent is a set of
retro reflective tapes sewn to the sides and the stern.
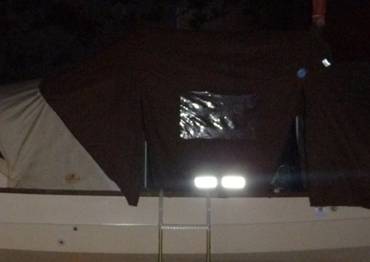

In
the left hand picture you can see how effective they are. In the right hand
picture of Appuskidu moored at Brodick, you need to
imagine that you have had a good evening ashore but the pub has now shut and
you are rowing the dinghy back to the mooring on a dark and moonless night
where you wave your torch around at dark shapes in the gloom . . . . .
The
other pair of reflective tapes at the top of the rear tent panel are deliberately placed higher as they are intended to
supplement the stern light to help any larger craft overtaking me at night to
avoid turning my boat into their ship’s figurehead.
Sun awning
Finally,
on a lighter and sunnier note, a simpler project is to make a bimini or awning for the cockpit. Both pictures below were
taken in Venetian waters but both awnings were designed with those rare hot
summer days in our more northerly climes in mind.


Appuskidu’s awning has
sides for extra protection when the sun is not vertically above. It is
supported in the main by lines to the masts. The boat hook then spreads the
front with its ends clipped to the shrouds and the jib stick spreads the rear
with its ends controlled by lines down to the gunwale cleats. The awning is
sewn from offcuts left over after making the boat
cover.
On
the right is Jack O’Keefe’s effective but much simpler awning on Tyboat. It comprises his cockpit cover lifted by the
mainsheet from the end of his wishbone boom to the centre of the cover. It is
spread at the rear by the spinnaker pole and by another spar at the front.